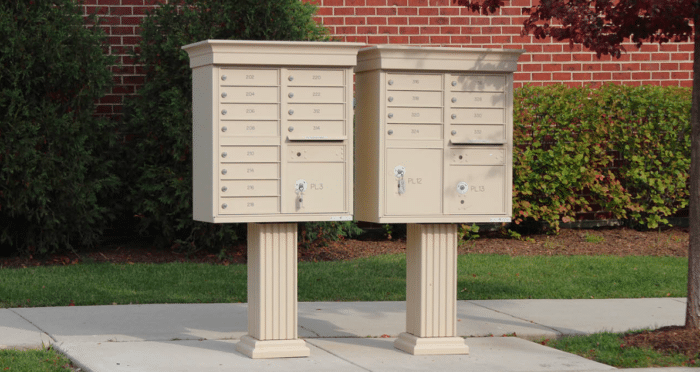
DIY Guide: Installing Your Cluster Mailbox the Right Way
Welcoming a new cluster mailbox into your home is more than just an upgrade to your curb appeal—it’s a commitment to convenience, security, and community coherence. But before you embark on this transformative journey, understanding the nuances of installation is crucial. It’s not just about digging a hole and setting up a post; it’s about meticulous planning, precise execution, and adherence to standards that ensure longevity and compliance.
Setting the Stage for a Successful Installation
The process of installing a cluster mailbox can be straightforward, but it requires a thoughtful approach. In this guide, we’ll walk you through each step, ensuring that your mailbox isn’t just installed, but is set up to stand the test of time and the scrutiny of regulations. From gathering the right tools to understanding the crucial post-installation practices, this DIY guide is designed to empower you with knowledge and confidence.

The Importance of Getting It Right
A properly installed cluster mailbox does more than just receive mail. It ensures security, withstands weather conditions, and aligns with the aesthetic of your neighborhood. Moreover, adhering to the guidelines set by the United States Postal Service (USPS) is not just recommended; it’s required. In this guide, we’ll highlight these key considerations, helping you navigate the installation process like a seasoned pro.
As you continue, remember that installing your cluster mailbox the right way is an investment in your home’s functionality and appeal. Let’s dive into the details and ensure that your mailbox is a source of pride and practicality for years to come.
Understanding the Basics
Embarking on the installation of your cluster mailbox begins with a solid grasp of the foundational requirements. This section ensures you’re well-equipped with the knowledge and resources needed before you start digging.
Consulting USPS Guidelines: The First Step
The United States Postal Service (USPS) isn’t just the entity that delivers your mail; it’s also the governing body that sets the standards for how and where your mailbox can exist. Before anything else, familiarize yourself with the USPS guidelines for cluster mailbox installations. These regulations cover everything from the placement of the mailbox to the height at which it should stand, ensuring accessibility, safety, and uniformity.
Gathering Your Tools and Materials
Like any well-executed project, having the right tools and materials from the get-go is essential. This isn’t just about having a shovel and some screws; it’s about preparing the materials that will ensure your mailbox stands sturdy and secure. From concrete for a solid foundation to the right fasteners that resist rust and wear, each component plays a critical role in the longevity of your installation.
Preparing the Installation Site
The spot you choose for your cluster mailbox isn’t just a plot of land; it’s the future central hub for your correspondence. This step involves more than just clearing the area. It’s about ensuring the ground is level, the location is accessible, and the site is free from potential hazards. Whether it’s considering the local soil type or planning for drainage, a well-prepared site is the first line of defense against future issues.
Step-by-Step Installation Process
With a solid foundation of understanding and preparation, you’re now ready to embark on the actual installation of your cluster mailbox. This step-by-step guide ensures that each phase of the process is executed with precision and care, setting the stage for a mailbox that’s not just installed, but installed right.
- Site Preparation: Laying the Groundwork
Every great structure starts with a solid foundation, and your cluster mailbox is no exception. Begin by marking out the area based on the USPS guidelines, ensuring the location is both practical and compliant. Next, dig the hole for the post, keeping in mind the depth and width requirements. This is also the time to ensure that any underground utilities are identified and avoided.
- Post Installation: Setting the Stage
The post of your cluster mailbox is the backbone of the entire structure. Installing the post correctly is crucial for the stability and durability of your mailbox. After placing the post in the prepared hole, use concrete to secure it in place. Ensure that it’s perfectly vertical and aligned, as this sets the stage for the entire structure.
- Mounting the Mailbox: The Main Event
With the post securely in place, it’s time to mount the mailbox itself. This step requires precision and attention to detail. Align the mailbox with the post, ensuring that it’s at the correct height and orientation as per USPS regulations. Secure the mailbox to the post using the appropriate fasteners, checking for stability and alignment throughout the process.
- Final Checks and USPS Inspection
Your cluster mailbox might look ready, but before you start receiving mail, a few final checks are necessary. Review every component for stability and compliance with USPS guidelines. Once you’re satisfied, schedule an inspection with the local postmaster. Their approval is the final stamp of confirmation that your mailbox is ready for use.
Common Mistakes to Avoid
Installing your cluster mailbox is an exciting project, and like any new endeavor, it’s a learning experience. While it’s natural to encounter a few hiccups along the way, being aware of common missteps can make your installation process smoother and more enjoyable. Let’s gently navigate through some of these common oversights and learn how to sidestep them.
Not Fully Embracing USPS Guidelines: Let’s Get It Right
The USPS guidelines are there to help, ensuring every cluster mailbox meets the necessary standards for accessibility, security, and aesthetics. It’s easy to miss a detail or two, so taking the time to thoroughly understand these guidelines is like having a roadmap to success. Remember, aligning with these standards from the get-go saves time and energy, ensuring your installation is on point from the start.
Overlooking Site and Post Preparation: Setting the Stage
The right start sets the tone for the entire installation. Ensuring your site and post are well-prepared might seem like small steps, but they’re actually huge strides toward a perfect mailbox setup. It’s all about creating a solid foundation and aligning everything just right. Think of it as the care you’d put into setting the foundations of your home—it’s that important.
Opting for Less Durable Materials: Quality Counts
Choosing the right materials is like picking ingredients for a special recipe—it really does make all the difference. While it might be tempting to go for cheaper options, investing in quality materials ensures your mailbox stands strong, looks great, and serves you well for a long time. It’s about creating a mailbox that you’re proud to see every day and that withstands the test of time and weather.
Forgetting About Regular Maintenance: A Little Love Goes a Long Way
Once your mailbox is up and looking fabulous, a little regular care can keep it that way. Just like tending to a garden or servicing your car, your mailbox loves a bit of attention too. A quick check now and then, a gentle clean, or a swift touch-up can make all the difference. It’s all about cherishing and maintaining this new addition to your home, ensuring it continues to bring convenience and joy to your daily life.
Post-Installation: Nurturing Your New Cluster Mailbox
Congratulations on successfully installing your new cluster mailbox! This addition is not just an upgrade to your curb appeal; it’s a new member of your home, ready to serve you loyally. But like any valued part of your home, it deserves care and attention to maintain its functionality and appearance. Here’s how you can nurture your mailbox in the days post-installation.
Giving Your Mailbox the Care It Deserves
Your mailbox does more than collect your letters and parcels; it stands guard against the elements and keeps your correspondence secure. Regular maintenance is key. Gently cleaning it, checking for any loose parts, and ensuring it’s always in tip-top shape is the secret to extending its life and performance. It’s these small acts of care that keep it looking pristine and functioning flawlessly.
Securing Your Correspondence: A Safe Haven for Your Mail
In today’s world, the security of your mail is paramount. Consider adding a lock to your cluster mailbox or exploring other security features. It’s not just about protecting your mail; it’s about peace of mind, knowing your correspondence is safe and sound. And remember, if you notice anything amiss, addressing it sooner rather than later can prevent bigger issues down the road.
Final Thoughts
Your journey with your new cluster mailbox is just beginning. With the right installation, care, and attention, it will serve you well for years to come, becoming a cherished part of your daily routine. But remember, the journey doesn’t end here.
We invite you to continue exploring, learning, and connecting with us. Whether you’re looking for more tips on mailbox maintenance, seeking advice on mailbox security, or considering your next upgrade, Mailbox Works is your dedicated partner.
Got a story to share about your installation? Do you have questions or need some personalized advice? Our friendly team is just a click or a call away. Visit our contact us page, and let’s keep the conversation going. Your mailbox is more than just a receptacle for mail – it’s a part of your home, and at Mailbox Works, we’re committed to helping you make the most of it.
Together, let’s ensure your mailbox is not just a feature of your home but a cornerstone of your daily satisfaction and security. We’re here to make your mailbox experience as delightful and hassle-free as possible today, tomorrow, and for years to come.
Browse our collection of cluster mailboxes at MailboxWorks today or call us at 1-866-717-4943 for personalized recommendations.
Tags: Cluster Box Unit (CBU) MailboxesCategorized in: Mailbox Installation & Upgrades


